
I worked really hard to make a new banner with a winter-y theme. I tried so many times to make the bare branches look like branches and not blood veins. I abstained from stealing a Graham & Brown wallpaper and modifying it for my banner, even though it looked 100 times better than what I made, because that would just be wrong. I was good! I toiled over this thing! I double-checked the html to make sure I was making it the right size.
So will somebody please tell me why the blasted thing hangs over the side of the banner area?
Sunday, January 31, 2010
Wednesday, January 27, 2010
Why Cast Iron? Part III
We've talked about the health and eco-benefits of using cast iron, but maybe you're still thinking "ya, but its still a pain in my bum to take care of". Oh no, that's where you're wrong my friend.
There really aren't any hard and fast rules when it comes to using cast iron cookware. However, there are a few things I recommend avoiding to get the best results.
I mentioned that I reach for a cast iron pan 9 times out of 10. So what am I cooking the other 10% of the time? If I'm cooking anything that contains tomatoes I use a stainless-steel pan and the same goes for boiling a pot of water (to cook pasta, etc). But like I said, these aren't concrete rules, so you'll find folks who do cook tomato-based dishes and, in fact, swear that by doing so they are leaching extra iron in their diet. While that is another health benefit of cast iron, I'd still recommend against it because all that leaching is also removing some of your finish.
Wait! I can think of one absolute rule: do NOT take your hot pan from the stove and stick it in cold water. It could break. Oh, and standing water is the devil. That's two.
So, what about when dinner is done and its time to clean up?
There are two schools of thought here. Some people are firmly on the No Soap side while others aren't averse to a little suds.
I've rounded up a couple links for your reading pleasure.
Well, the first one might not titillate you. Its a pretty straight-forward presentation of caring for your cast iron including why its OK to use soap. And it is, but you will never experience cookware nirvana if you do.
I suggest reading this post over at One Particular Kitchen titled Cast Iron Care: Not for the Germaphobic. First, the title made me chuckle and I was happy to find information that outlined the old-school way of caring for cast iron, while keeping it simple. Plus, its a great read because the author is friendly, witty and gorgeous *waves at Erin* (actually, I've never met her, but I'm sure she is stunning).
So go read the One Particular Kitchen post and I'll say ditto. But I would like to add one more thing: I have good luck cleaning my skillets with grease. What? No, really. I'm not that great at remembering to clean the pan when its still warm so if I find something gunking up my pan, I put it on a burner to warm, add a little butter/oil/whatever is handy and let it melt into the gunk. Then it scrapes off easily and the pan can go to the sink for a little hot water swish, it works just like deglazing a pan.
I couldn't think of a recipe to share with you today, I'm just too worn out from trying to bring you all over tothe dark side my way of thinking.
So, have a great weekend and I will see you all back here for The Big Giveaway on Monday.
And if you come here for craftiness and you're thinking "just sew something already, I don't want your stinkin mitts". Relax, I made something yesterday and took tons of pictures. Watch for a tutorial next week that is a great beginners project!
There really aren't any hard and fast rules when it comes to using cast iron cookware. However, there are a few things I recommend avoiding to get the best results.
I mentioned that I reach for a cast iron pan 9 times out of 10. So what am I cooking the other 10% of the time? If I'm cooking anything that contains tomatoes I use a stainless-steel pan and the same goes for boiling a pot of water (to cook pasta, etc). But like I said, these aren't concrete rules, so you'll find folks who do cook tomato-based dishes and, in fact, swear that by doing so they are leaching extra iron in their diet. While that is another health benefit of cast iron, I'd still recommend against it because all that leaching is also removing some of your finish.
Wait! I can think of one absolute rule: do NOT take your hot pan from the stove and stick it in cold water. It could break. Oh, and standing water is the devil. That's two.
So, what about when dinner is done and its time to clean up?
There are two schools of thought here. Some people are firmly on the No Soap side while others aren't averse to a little suds.
I've rounded up a couple links for your reading pleasure.
Well, the first one might not titillate you. Its a pretty straight-forward presentation of caring for your cast iron including why its OK to use soap. And it is, but you will never experience cookware nirvana if you do.
I suggest reading this post over at One Particular Kitchen titled Cast Iron Care: Not for the Germaphobic. First, the title made me chuckle and I was happy to find information that outlined the old-school way of caring for cast iron, while keeping it simple. Plus, its a great read because the author is friendly, witty and gorgeous *waves at Erin* (actually, I've never met her, but I'm sure she is stunning).
So go read the One Particular Kitchen post and I'll say ditto. But I would like to add one more thing: I have good luck cleaning my skillets with grease. What? No, really. I'm not that great at remembering to clean the pan when its still warm so if I find something gunking up my pan, I put it on a burner to warm, add a little butter/oil/whatever is handy and let it melt into the gunk. Then it scrapes off easily and the pan can go to the sink for a little hot water swish, it works just like deglazing a pan.
I couldn't think of a recipe to share with you today, I'm just too worn out from trying to bring you all over to
So, have a great weekend and I will see you all back here for The Big Giveaway on Monday.
And if you come here for craftiness and you're thinking "just sew something already, I don't want your stinkin mitts". Relax, I made something yesterday and took tons of pictures. Watch for a tutorial next week that is a great beginners project!
Monday, January 25, 2010
Why Cast Iron? Part II
This is part two of a series designed to pique your interest in cast iron cookware (and the little mitts I make to go on the handles. Sneaky, ain't I?).
In addition to being flat out fabulous cookware, cast iron also loves Mother Earth.
Disclaimer:I do not eat twigs and berries, have never had dreadlocks and do not belong to the Sierra Club or GreenPeace. So if you are looking for a hippie hero you've come to the wrong place. I am not a "green" expert.
I hate waste, in any form, so I appreciate that cast iron literally lasts for generations. A lot of cooks are using their Granny's cast iron pans and they are just as good today as they were 50 years ago (if not better). Cast iron is also recyclable but often there is no need; even the rustiest, nastiest pans can be reseasoned and put back to good use. So if you're considering a purchase, check your local thrift stores before paying retail.
Do you have any non-stick cookware that is flaking a little? Keep in mind that those flakes are being transferred to your food (and body) and also washed down the drain. The chemicals used to manufacture non-stick coatings, 4 of which never break down, are washed into our waterways and environment. And while the manufacture of cast iron is not without ramifications, it pales in comparison to the levels of toxicity generated by non-stick cookware. Here is a link to the eco-responsibility page of Lodge Mfg, if you're interested in reading about what they've done to reduce their environmental impact.
A couple of less obvious advantages of cast iron:
1. If you're caring for your pans properly, you aren't using soap to clean them. No detergents down the drain!
2. Cast iron holds heat exceptionally well, and so uses less energy to cook your meal.
Food for thought, and now some food for your tummy:
Cast iron lends itself remarkably well to going from stovetop to oven, so I always reach for my Dutch oven when its time to make
Pot Roast
3 1/2 - 4 lb pot roast
salt & pepper
2 T. vegetable oil
1 med. onion, chopped
1 clove garlic, minced
1 can reduced-sodium chicken broth
1 stem thyme
1 - 1/2 c. water
6 carrots, cut into lg. chunks
1 1/2 lb. potatoes, quartered
1. Heat oven to 300. Liberally sprinkle roast with salt and pepper.
Heat oil in a Dutch oven over med-high heat & brown roast on all sides. Remove and set aside.
2. Reduce heat to med-low, add onion; cook until it begins to soften. Add garlic, broth and thyme; scrape pan to release yummy browned bits. Return roast to pan and add just enough water to come halfway up the sides of roast (this is important: too little you're roasting, halfway you're braising, too much and you're just boiling the bejeebers out of it). Bring liquid to a simmer, cover with a lid and place in the oven.
3. Cook, turning every 30 minutes, for 2 hours. Add carrots and potatoes (you can also add the onion at this point; but I'm a fan of onion flavor, not necessarily a big bite of onion so I prefer mine cooked to mush). Cook another 2 hours, turning the roast every 30 min., or until the roast is tender. Remove roast and vegies (a slotted spoon is handy) to a warm platter. Strain the pan juices (I usually don't bother) and thicken to make gravy. Season to taste.
In addition to being flat out fabulous cookware, cast iron also loves Mother Earth.
Disclaimer:
I hate waste, in any form, so I appreciate that cast iron literally lasts for generations. A lot of cooks are using their Granny's cast iron pans and they are just as good today as they were 50 years ago (if not better). Cast iron is also recyclable but often there is no need; even the rustiest, nastiest pans can be reseasoned and put back to good use. So if you're considering a purchase, check your local thrift stores before paying retail.
Do you have any non-stick cookware that is flaking a little? Keep in mind that those flakes are being transferred to your food (and body) and also washed down the drain. The chemicals used to manufacture non-stick coatings, 4 of which never break down, are washed into our waterways and environment. And while the manufacture of cast iron is not without ramifications, it pales in comparison to the levels of toxicity generated by non-stick cookware. Here is a link to the eco-responsibility page of Lodge Mfg, if you're interested in reading about what they've done to reduce their environmental impact.
A couple of less obvious advantages of cast iron:
1. If you're caring for your pans properly, you aren't using soap to clean them. No detergents down the drain!
2. Cast iron holds heat exceptionally well, and so uses less energy to cook your meal.
Food for thought, and now some food for your tummy:
Cast iron lends itself remarkably well to going from stovetop to oven, so I always reach for my Dutch oven when its time to make
Pot Roast
3 1/2 - 4 lb pot roast
salt & pepper
2 T. vegetable oil
1 med. onion, chopped
1 clove garlic, minced
1 can reduced-sodium chicken broth
1 stem thyme
1 - 1/2 c. water
6 carrots, cut into lg. chunks
1 1/2 lb. potatoes, quartered
1. Heat oven to 300. Liberally sprinkle roast with salt and pepper.
Heat oil in a Dutch oven over med-high heat & brown roast on all sides. Remove and set aside.
2. Reduce heat to med-low, add onion; cook until it begins to soften. Add garlic, broth and thyme; scrape pan to release yummy browned bits. Return roast to pan and add just enough water to come halfway up the sides of roast (this is important: too little you're roasting, halfway you're braising, too much and you're just boiling the bejeebers out of it). Bring liquid to a simmer, cover with a lid and place in the oven.
3. Cook, turning every 30 minutes, for 2 hours. Add carrots and potatoes (you can also add the onion at this point; but I'm a fan of onion flavor, not necessarily a big bite of onion so I prefer mine cooked to mush). Cook another 2 hours, turning the roast every 30 min., or until the roast is tender. Remove roast and vegies (a slotted spoon is handy) to a warm platter. Strain the pan juices (I usually don't bother) and thicken to make gravy. Season to taste.
Why Cast Iron? Part I
Okay, here's the part where I shamelessly promote things in my Etsy shop.
I've added my little Cast Iron Mitts to the shop and wanted to explain why I have such an affection for this kind of cookware. But the list of all the reasons why cast iron rocks grew longer and longer. So I decided to break it up into a few shorter posts and declare this to be "Cast Iron Week".
When I'm cooking I will reach for a cast iron pan 9 times out of 10. I do not own any non-stick cookware. Why?
Here is a link to ewg.org where you can read about their independent tests.
I've added my little Cast Iron Mitts to the shop and wanted to explain why I have such an affection for this kind of cookware. But the list of all the reasons why cast iron rocks grew longer and longer. So I decided to break it up into a few shorter posts and declare this to be "Cast Iron Week".
When I'm cooking I will reach for a cast iron pan 9 times out of 10. I do not own any non-stick cookware. Why?
(I was going to insert a picture of a dead parakeet here but it was just too gross.)
Because there is enough evidence that non-stick cookware is hazardous to your health to give me a healthy fear of it.
Cast iron builds a non-stick coating through the carbonization of fats; so over time it just gets better and better.
Non-stick cookware is made with perfluorochemicals (PFCs) which, when heated to a certain temperature, give off a toxic gas that is especially lethal to birds. DuPont (manufacturer of teflon) would like me (and you) to believe that this only happens at extreme temperatures not reached during normal use. They classify "normal" use as cooking over low to medium heat. So if you've ever set your non-stick pan on the burner and forgotten about it for a couple minutes... yup, you may have had polymer fume fever. No, I didn't just make that up.
I know that all my readers are brilliant, so I'm going to provide a link to both sides of the issue and let you make your own informed decision. For my family, I've decided that its just not worth the risk especially considering that there is a much better alternative out there.
Here is a link to ewg.org where you can read about their independent tests.
I was thinking that instead of just being a know-it-all, I should share with you some practical information as well. So I thought about some of the recipes that I make in my cast iron pans. Then I realized I'd invited a food blogger to stop by the blog. uh-oh. So, even at risk of ridicule here is a recipe that I made in my skillet this weekend:
Fry Bread
1 1/2 cups flour
1 tsp. baking powder
1 tsp. sugar
2 tsp. shortening
3/4 cup milk
1. Combine dry ingredients. Cut in shortening. Add enough milk to make the dough come together. Turn out onto a lightly floured surface and knead lightly.
2. Divide dough into 8 portions. Pat with hands until dough forms a round about 1/4 inch thick. Use your finger to poke a hole in the center.
3.Fry in about an inch of oil that is hot but not smoking. Turn only once, frying about 1 minute on each side. Drain on paper towels. Serve immediately.
We had this with a pot of beans. Yum.
So much for shorter posts, eh?
Wednesday, January 20, 2010
I did it!
But you can't say it regular, you have to say it like somebody crazy.
Say it like.... like Bobcat Goldthwait. Ya, all high pitched and freaking out. Because that's what I'm doing right now.
Look at my little Etsy Shop thingy in the sidebar. *eeeeeeeeeeeek*
*deep breath*
Okay, I know its customary for crafty bloggers to have a giveaway when they add a new item to their shop, but... since I only have a handful of readers (half of whom I share DNA with) it seems a little silly. So if you can think of someone you know that cooks with cast iron and would like to have a set of these mitts, refer them to my little blog and we'll do a giveaway:

I have Analytics and I'm not afraid to use it, so all you lurkers get out there and drag your friends kicking and screaming to my blog. I'll do my part and go soliciting readers and we'll meet back here for the give-away, lets shoot for February 1st. How does that sound?
And do yourself a favor and go to that YouTube link for Bobcat, I just about fell out of my chair.
Monday, January 18, 2010
I'm gonna do it
Really.
Since I started this blog I've been telling you its so I can shamelessly hawk my Etsy Shop. Except it doesn't exist. Well, actually it does. Its just sitting there sad and empty.
A lot of things have been holding me back:
#1-I'm a weenie. Have you been there lately (Etsy, I mean)? Its full of fabulously talented creative people. I feel out-classed when I look at the things other people are making.
#2-I'm stinky (at graphics, I mean). But I kept plugging away at it and I finally made a banner and avatar that I'm not mortified to put up in my shop. You could stop by and tell me what you think if you have a minute.
#3-It would be insanity to start up my shop smack in the middle of the Christmas rush. Or that's what I was telling myself during December. Now we're halfway through January, so what's my excuse?
I guess I'm just being a weenie now. I need to set a goal. Yup, like 'I will open my shop by the end of this week'.
Did I just say that?
Should I poke "publish post" and let you all see that I just said that?
Cause then I'd HAVE to do it!
*deep breath*
Friday, January 15, 2010
John Deere Cake
I made a cake yesterday. Do you want the good news or the bad news first?
I think I'll tell you what didn't work first, then cheer myself with the good news.
Flop #1: The Cake
I had a recipe for Buttermilk White Cake that I had high hopes for because buttermilk makes all baked goods lovely and moist, right? Blech, it felt like cornbread in your mouth.
#2: The Frosting
I've made Swiss Meringue Buttercream before. Now THAT is frosting, in the cookbook alongside the recipe I've written a little note that says 'heaven on a cupcake'. And it is, but its also very light and delicate and so I've never tried to use it for decorating. So when I found Italian Meringue Buttercream, along with promises that it is more stable than the Swiss method, I was excited to try it. Things were going along swimmingly until the last step *cue ominous music*, adding the butter. It turned into butter soup. It was delicious soup but useless for icing a cake. I tried adding powdered sugar, hoping to thicken it enough to salvage the mess but after adding enough to make my teeth ache, it was still a loss. So I whipped up a batch of the old standby.
And landing somewhere in between yay and boo: reverse icing. I'll briefly explain: you ice a piece of parchment, assemble the cake on top, ice the sides and flip the whole thing over. Why would anyone try this insanity? Its supposed to give you an absolutely level top and a sharp edge, which it did. But the cake was frozen (easier to work with) when I started and once it started to warm up weird things happened. The top became, ah... not level. And air bubbles started to push out the frosting on the sides making big, ugly cake hernias. Hmm, yep, I should probably file that under flop.
Here is the cake before things started going downhill:
 I am depressed, maybe it wasn't a good idea to start with the bad news.
So, what worked?
My diy Bake-Even strips! I just dampened some strips of towel and wrapped them around the pans before sliding them in the oven. The cakes came out nice and high but with no dome. Of course, afterward it occurred to me to Google it and I see that other folks are wrapping their lengths of wet towel in foil. Must try!
I'm also pretty pleased with my first frozen buttercream transfer. I'll briefly explain: print a mirror image of a graphic, tape wax paper over it, outline the design, fill in with thin frosting and freeze until it turns into a pancake you can flip over and place on the cake. I know mine has weird lines, but I'm learning. This was actually easier than I expected, you should try it too.
Or not, if cake decorating doesn't blow your skirt up.
Tuesday, January 12, 2010
creamer query
Since I've refurbished the china hutch, I keep an eye open when I'm at the thrift store for pretties to put inside. Today we found a little vintage creamer that I like and at the store it had the little lid taped on so I didn't notice this at first. But when I set it in the hutch I noticed that the lid sits a little wonky:

I was curious so I Googled it and found a listing on ebay with the identical creamer and no lid.
I was curious so I Googled it and found a listing on ebay with the identical creamer and no lid.
Are any of my readers knowledgeable about such things? I wonder if the lid had been mistakenly added to mine? I'm displaying it without the lid because the wonkiness is really obvious on the shelf at eye level. What do you think?
Sunday, January 10, 2010
Acorn Jumper
In the purple dress post I was belly-aching about the fact that the major pattern companies seem to be unaware that little kids are .... little, and bemoaning the fact that I don't know how to draft a sloper. So maybe now you're wondering (or not) 'if you don't ordinarily follow a pattern and you can't draft a pattern, what are you doing over there?'

Well its a very complicated and precise process involving... a Sharpie. To be fair, although I am labeling it as such, I should warn you that this is not an in-depth tutorial because I didn't take step-by-step photos as I was feeling a little frazzled. Its more like a guideline or an overview. If you're an absolute beginner, DON'T attempt to follow this dreck.
The first step is having a dress that resembles the look you're after. Buggy already had this jumper in her closet so I laid it on a big piece of blank newsprint (freezer paper or standard sized paper taped together also work) and traced around the front and back using a marker.
The skirt is made up of tiers but I didn't think that would look as nice with the print fabric I had, but I wanted more than just a basic A-line. Hmm, what to do? I cruised through some of the websites of popular children's clothing lines and stole ideas found inspiration. I found one I liked that had large box pleats on the front. In this next photo we see the finished bodice and the front of the skirt with contrasting fabric for the inside of the pleats. That's a pretty big leap (actually that's a huge leap, it should be illegal for me to call this a tutorial) so I'll do my best to explain what I did. After tracing all the pieces of the original jumper, I cut them out with extra around the perimeter for seam allowance (I like 3/8" for garment seams). If you're planning to make the large pleats in the front, add an additional 3/8" to each side of the front of the skirt for seam allowance. The original jumper also had facings, which for some reason I don't care for. I cut a front and back bodice piece from the contrasting brown fabric for a lining. Also I should mention that I wanted to forgo the zipper in the back so I extended the back bodice at the shoulder straps enough to overlap at the front for a button closure. If you're also liking the look (and ease) of buttons, just measure over your daughter's shoulder to find the right length for the strap and don't forget to add extra for seam allowance.
When the pieces are all cut out its time to sew the bodice. Put the print fabric pieces right sides together and sew at the side seams (under the armhole); repeat for the lining pieces. Press seams open. **If I forget to mention it, always assume that you should press a seam after it is sewn**
Place the print fabric and lining together with right sides facing and side seams matched; sew all the way around the top (all the curvy parts, ie. armholes, straps and neckline). Turn right side out and press.
For the skirt, I measured an equal distance from each side and just cut right up the front. The contrasting pieces are just rectangles that measure 6 3/4" wide and are a little longer than the skirt (so I can cut them to match the curve of the hem once I sew the skirt together. Like I said very precise...).
This next picture shows the front of the skirt with the inserts, um... inserted and on the right side you see that I brought the print fabric together. Sew the pleats closed, along the seam, to about 3 1/2" down the seam line (or about the distance to the hip). Spread the contrasting fabric so that an equal amount overlaps each side of the seam and press. Thus forming the box pleat.
 With right side together, sew the skirt front and back together at the side seams and press.
Time to sew the skirt to bodice. Place them right sides together and match the side seams. Sew around, taking care to keep your pleats nice and flat.
Sew on the buttons and make button-holes in the straps.
Hem the bottom to the desired length and press the pleats again to get them nice and flat.
Here is my finished jumper laying flat:
 Here it is on my favorite four year old:
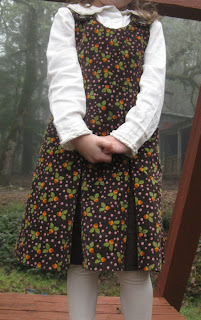 And here is a picture that shows the pleats nicely flared out:

I realize that parts of this are pretty vague, so if you need more specifics about a step, please don't hesitate to ask.
Also, one of my favorite blogs to read, Ikat Bag, has promised a jumper tutorial soon. Lier knows what she is doing, so wander that way and see what she has in store. Her blog is worth a visit anyway because it is stuffed full of free tutorials (real ones), plus she is witty and hilarious.
Wednesday, January 6, 2010
Perfect Storm
My eye is twitching, its too much.
The delivery man just dropped off a package of new books including this one:

Remember this post when I mentioned I'd like to splurge on some delicious yarn? The really tiny town I live in has a really great yarn shop! I'd never visited before so I almost died when I walked in and saw the floor to ceiling cubbies and baskets filled with yummy, soft yarn. And a table with chairs where a couple of ladies were knitting and clucking about grandbabies. It was all so wonderful but I forced myself to make a decision and came home with this:
1. The landlady is visiting on Friday so I need to kick some of the toys under the couch and try to keep the house somewhat clean until then.
2. The baby is getting 4 teeth all at once.
Just like that.
The delivery man just dropped off a package of new books including this one:

Remember this post when I mentioned I'd like to splurge on some delicious yarn? The really tiny town I live in has a really great yarn shop! I'd never visited before so I almost died when I walked in and saw the floor to ceiling cubbies and baskets filled with yummy, soft yarn. And a table with chairs where a couple of ladies were knitting and clucking about grandbabies. It was all so wonderful but I forced myself to make a decision and came home with this:
 This yarn is a wool, alpaca and silk blend and it. is. heavenly. *squeals* I am not blessed with knitting skills but with yarn that is such a pleasure to hold in your hand, who cares!
Plus, I have some corduroy that I found on the sale rack when JoAnn was having the 50% sale. It has an acorn print, which Buggy is wild about, so I've been working on a jumper for her. I took a few pictures and I'd really like to finish because I'm excited to share them with you guys.
I'm surrounded by fabulousness and I just want to immerse myself in everything at once. So now you're wondering how all this combines to make a perfect storm?1. The landlady is visiting on Friday so I need to kick some of the toys under the couch and try to keep the house somewhat clean until then.
2. The baby is getting 4 teeth all at once.
Just like that.
Saturday, January 2, 2010
Photography Attempts
I've been experimenting with taking my camera off of the auto setting. So yesterday when we went for a drive, it was a perfect opportunity to try some of my new-found knowledge. Some of the results were truly lame:

And sometimes I take a shot that gives me hope that I won't always be stinky at photography:

It has been pretty typical Oregon weather lately (hallelujah, single-digit weather does not amuse me) so the streams were full and rushing along. Around every corner was a surprise waterfall created by the run-off water. This photo is actually taken on a bridge (mossy surface in the foreground) over a creek. I set the aperture as high and as low as my camera would allow for two different photos. This photo is the one with the aperture set high (8.0 with ISO at 100) and I like the flow-y look it gives the water.
If you're interested in learning a little more about photography, I like the articles on Pioneer Woman's site. They give enough information to inspire me without making my head hurt.
Subscribe to:
Posts (Atom)

