In the purple dress
post I was belly-aching about the fact that the major pattern companies seem to be unaware that little kids are .... little, and bemoaning the fact that I don't know how to draft a sloper. So maybe now you're wondering (or not) 'if you don't ordinarily follow a pattern and you can't draft a pattern, what
are you doing over there?'
Well its a very complicated and precise process involving... a Sharpie. To be fair, although I am labeling it as such, I should warn you that this is not an in-depth tutorial because I didn't take step-by-step photos as I was feeling a little
frazzled. Its more like a guideline or an overview. If you're an absolute beginner, DON'T attempt to follow this dreck.
The first step is having a dress that resembles the look you're after. Buggy already had this jumper in her closet so I laid it on a big piece of blank newsprint (freezer paper or standard sized paper taped together also work) and traced around the front and back using a marker.
The skirt is made up of tiers but I didn't think that would look as nice with the print fabric I had, but I wanted more than just a basic A-line. Hmm, what to do? I cruised through some of the websites of popular children's clothing lines and stole ideas found inspiration. I found one I liked that had large box pleats on the front. In this next photo we see the finished bodice and the front of the skirt with contrasting fabric for the inside of the pleats. That's a pretty big leap (actually that's a huge leap, it should be illegal for me to call this a tutorial) so I'll do my best to explain what I did. After tracing all the pieces of the original jumper, I cut them out with extra around the perimeter for seam allowance (I like 3/8" for garment seams). If you're planning to make the large pleats in the front, add an additional 3/8" to each side of the front of the skirt for seam allowance. The original jumper also had facings, which for some reason I don't care for. I cut a front and back bodice piece from the contrasting brown fabric for a lining. Also I should mention that I wanted to forgo the zipper in the back so I extended the back bodice at the shoulder straps enough to overlap at the front for a button closure. If you're also liking the look (and ease) of buttons, just measure over your daughter's shoulder to find the right length for the strap and don't forget to add extra for seam allowance.
When the pieces are all cut out its time to sew the bodice. Put the print fabric pieces right sides together and sew at the side seams (under the armhole); repeat for the lining pieces. Press seams open. **If I forget to mention it, always assume that you should press a seam after it is sewn**
Place the print fabric and lining together with right sides facing and side seams matched; sew all the way around the top (all the curvy parts, ie. armholes, straps and neckline). Turn right side out and press.
For the skirt, I measured an equal distance from each side and just cut right up the front. The contrasting pieces are just rectangles that measure 6 3/4" wide and are a little longer than the skirt (so I can cut them to match the curve of the hem once I sew the skirt together. Like I said very precise...).
This next picture shows the front of the skirt with the inserts, um... inserted and on the right side you see that I brought the print fabric together. Sew the pleats closed, along the seam, to about 3 1/2" down the seam line (or about the distance to the hip). Spread the contrasting fabric so that an equal amount overlaps each side of the seam and press. Thus forming the box pleat.
 With right side together, sew the skirt front and back together at the side seams and press.
Time to sew the skirt to bodice. Place them right sides together and match the side seams. Sew around, taking care to keep your pleats nice and flat.
Sew on the buttons and make button-holes in the straps.
Hem the bottom to the desired length and press the pleats again to get them nice and flat.
Here is my finished jumper laying flat:
 Here it is on my favorite four year old:
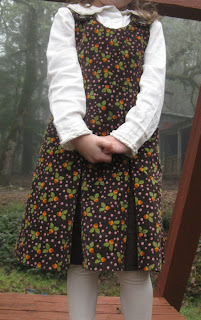 And here is a picture that shows the pleats nicely flared out:

I realize that parts of this are pretty vague, so if you need more specifics about a step, please don't hesitate to ask.
Also, one of my favorite blogs to read, Ikat Bag, has promised a jumper tutorial soon. Lier knows what she is doing, so wander that way and see what she has in store. Her blog is worth a visit anyway because it is stuffed full of free tutorials (real ones), plus she is witty and hilarious.


 I am depressed, maybe it wasn't a good idea to start with the bad news.


 This yarn is a wool, alpaca and silk blend and it. is. heavenly. *squeals* I am not blessed with knitting skills but with yarn that is such a pleasure to hold in your hand, who cares!


 Posts
Posts

