Showing posts with label tutorials. Show all posts

Tuesday, November 30, 2010

Wreath Making 101

There has been some interest in how I make a wreath (OK, one person but that's a biggie for this blog). So I made another wreath to give as a gift and took some pictures to share with you.

Here is what you'll need:

An old wire hanger, florists wire, wire cutters and a pair of garden clippers. This hanger happened to be wrapped in some sort of green coating so all the better. Snip off the hook and bend the wire into a circle. It doesn't have to be perfect, the greenery will hide any wonky parts. Snip off the excess wire and twist the ends to join:

Clip sections from your greenery and make a little bunch, like so:

(Keep in mind that mistletoe is toxic if you are using it for your wreath, so it should be kept away from little helpers and hung up high)

Place the bunch along the wreath frame and wrap it a few times along the length of the stems with florists wire. If you are not dexterity-challenged like me, you can leave the wire on the spool and wind it around the frame; I find it easier to work with 12-inch sections of wire. Make a new bunch of greenery and lay it along the frame so it is covering the stem ends of the previous bunch and keep wrapping with the wire as you go:


Working around the frame and covering the wire on the previous bunch as you go:

(Yes, that's blood on my finger. I thought about GIMP-ing it out, but I'm all about keeping it real. I should probably add a band-aid to the list of things you'll need)
Until you are back where you started. Then tuck the ends of the last bunch up under the first to hide the last of the wire. Snip off any greenery that is hanging out and messing up your circle-y shape:


The back:


For larger projects that carry a bit more weight, I have a little different method. That ugly thing on the left is a "real" wreath frame like you might find on a wreath that you've purchased. I mocked up an example of a frame that I've made in the past using heavy wire that I scavenged off something. That's what you see on the right, just two circles wired together at intervals with a lighter gauge wire. It can be made standard-sized for your door or ginormous for a space like over your garage doors.

Again, clip sections of greenery until you have a nice full bunch. Cut a 5-inch section of florists wire and form it into a hook:


Put the loop of the hook over the ends of the greenery:


Give it a couple twists to secure and lay the bunch along the frame. Use the ends of the florists wire to attach it to the frame:


Keep making bunches and layering them on the frame as in the previous example. Tucking in sprigs of different evergreens or random berries looks lovely too:

Keep going until you get all the way around (I didn't have enough fir, the neighbor ran me off his property) and clip the stray ends to clean it up. Wrap it with pretty ribbon, tie on a bow or just hang as is.
Any questions?

Monday, February 1, 2010

Diaper Wallet Tutorial

They grow so fast, don't they? My little baby is spending the Sunday School hour in the nursery now instead of nestled in my lap. So its time to pare down what I carry, we really just need the necessities now in case of ... well, you know. I looked around for a diaper wallet tutorial but wasn't thrilled with the pouch style that I found. I thought I'd prefer the folding type I've seen so I had to wing it. But you don't, here is my spanking new tutorial for a folding-style diaper wallet:

1. Cut your main fabric pieces:

2 - 11x12 in. pieces for the inner pockets

2 - 11x14 in. pieces for the outer shell. It would be fun to have different colors for the inner and outer sides of the shell too.


Also, think about what kind of closure you would like to have (or if you want one at all). I made a tab with a button on the outside, but a magnetic snap or velcro would work equally as well. If you opt for a snap it should be inserted in step 2 (follow instructions on snap packaging) before the pockets are sewn to the shell.


2. Fold both pocket pieces in half lengthwise with wrong sides together; and press. Align the long raw edge (arrow points to this edge in the photo below) with the short side of one of the shell pieces; right sides facing. Sew around just the 3 sides that have raw edges with a 1/4 in. seam allowance. At the corners, leave the needle in the down position and pivot the fabric to make sharp corners. Leave the folded edge open as in the photo. Repeat for other pocket. It will look like this:

3. I decided on a rounded tab and button closure so I used this specialized tool for making the rounded edge. Actually, this is a gasket thingy from a sippy cup, but any round-ish object you find around your house would work too. Or you could make it square. Just trace around your special tool:


4. Extend the curved edge with a ruler so that it measures about 3 1/2 in. in length. Cut 1/4 in. from the line for a seam allowance:


5. Place the pieces right sides together and sew around 1/4 in. from the edge. Clip the seam allowance around the curve:


6. Turn the tab right side out and press. Pin to the pocket with the raw edges aligned. Place the other piece of shell fabric on top with the right sides facing. Like so:


Here it is with the top piece of fabric folded back a little to give you a better idea of what your fabric sandwich should look like at this point:


7. Pin all the layers together. As a reminder to myself not to sew all the way around I like to leave doubled pins where I should stop:


8. Now sew around the edge with a 1/2 in. seam allowance, stopping where the double pins are to leave a space for turning the fabric right side out. Clip the excess fabric at the corners and turn right side out. Gently poke the fabric at the corners so you have a nice rectangular shape and press. Topstitch around very close to the edge and your wallet will look like this:

9. Now just finish up with a button hole in the tab and sew a button to the opposite side (or use velcro)
See? Super easy. I think this would be a great beginner project. Let me know if you make one, I'd like to see.

Sunday, January 10, 2010

Acorn Jumper

In the purple dress post I was belly-aching about the fact that the major pattern companies seem to be unaware that little kids are .... little, and bemoaning the fact that I don't know how to draft a sloper. So maybe now you're wondering (or not) 'if you don't ordinarily follow a pattern and you can't draft a pattern, what are you doing over there?'

Well its a very complicated and precise process involving... a Sharpie. To be fair, although I am labeling it as such, I should warn you that this is not an in-depth tutorial because I didn't take step-by-step photos as I was feeling a little frazzled. Its more like a guideline or an overview. If you're an absolute beginner, DON'T attempt to follow this dreck.
The first step is having a dress that resembles the look you're after. Buggy already had this jumper in her closet so I laid it on a big piece of blank newsprint (freezer paper or standard sized paper taped together also work) and traced around the front and back using a marker.


The skirt is made up of tiers but I didn't think that would look as nice with the print fabric I had, but I wanted more than just a basic A-line. Hmm, what to do? I cruised through some of the websites of popular children's clothing lines and stole ideas found inspiration. I found one I liked that had large box pleats on the front. In this next photo we see the finished bodice and the front of the skirt with contrasting fabric for the inside of the pleats. That's a pretty big leap (actually that's a huge leap, it should be illegal for me to call this a tutorial) so I'll do my best to explain what I did.After tracing all the pieces of the original jumper, I cut them out with extra around the perimeter for seam allowance (I like 3/8" for garment seams). If you're planning to make the large pleats in the front, add an additional 3/8" to each side of the front of the skirt for seam allowance. The original jumper also had facings, which for some reason I don't care for. I cut a front and back bodice piece from the contrasting brown fabric for a lining. Also I should mention that I wanted to forgo the zipper in the back so I extended the back bodice at the shoulder straps enough to overlap at the front for a button closure. If you're also liking the look (and ease) of buttons, just measure over your daughter's shoulder to find the right length for the strap and don't forget to add extra for seam allowance.

When the pieces are all cut out its time to sew the bodice. Put the print fabric pieces right sides together and sew at the side seams (under the armhole); repeat for the lining pieces. Press seams open. **If I forget to mention it, always assume that you should press a seam after it is sewn**

Place the print fabric and lining together with right sides facing and side seams matched; sew all the way around the top (all the curvy parts, ie. armholes, straps and neckline). Turn right side out and press.

For the skirt, I measured an equal distance from each side and just cut right up the front. The contrasting pieces are just rectangles that measure 6 3/4" wide and are a little longer than the skirt (so I can cut them to match the curve of the hem once I sew the skirt together. Like I said very precise...).

This next picture shows the front of the skirt with the inserts, um... inserted and on the right side you see that I brought the print fabric together. Sew the pleats closed, along the seam, to about 3 1/2" down the seam line (or about the distance to the hip). Spread the contrasting fabric so that an equal amount overlaps each side of the seam and press. Thus forming the box pleat.

With right side together, sew the skirt front and back together at the side seams and press.

Time to sew the skirt to bodice. Place them right sides together and match the side seams. Sew around, taking care to keep your pleats nice and flat.

Sew on the buttons and make button-holes in the straps.

Hem the bottom to the desired length and press the pleats again to get them nice and flat.

Here is my finished jumper laying flat:

Here it is on my favorite four year old:
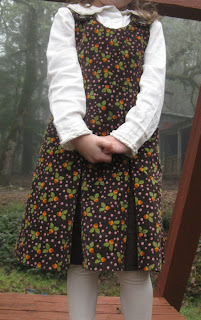
And here is a picture that shows the pleats nicely flared out:

I realize that parts of this are pretty vague, so if you need more specifics about a step, please don't hesitate to ask.

Also, one of my favorite blogs to read, Ikat Bag, has promised a jumper tutorial soon. Lier knows what she is doing, so wander that way and see what she has in store. Her blog is worth a visit anyway because it is stuffed full of free tutorials (real ones), plus she is witty and hilarious.

Wednesday, November 25, 2009

Thanksgiving Linens

I don't do much entertaining, when I do its normally of the paper plate variety. But for this Thanksgiving I've invited family for dinner and I wanted to be able to set a festive table. According to Martha's checklist I should be ironing my linens in preparation for the holiday, but I'm sure that's just a suggestion. Why would I do that when I could stay up half the night sewing napkins and a tablecloth?

And why not take the time for photos while I'm at it so I can show all of you? First, I should say that this is a story of making do with what I had on hand. I had some flour sack dish towels that I had purchased that were NOT high quality and I do NOT suggest that you also try this with cheap-o dish towels because they were a nightmare to sew.
The first thing I did with mine was give them a bath in strong tea to knock down the bright white color so people wouldn't feel shy about wiping their greasy lips on them:

I cut the dishtowels in half and they were really a little smaller than what I had in mind. When making these I suggest that you start with fabric that you can cut enough 20-inch (at least) squares to make the desired number of napkins.
So then I cut 3 1/2 inch strips from my tablecloth fabric and cut the strips into sections the width of my napkins. One long side of each strip was pressed 1/4 inch toward the wrong-side of the fabric:


Oh, look how nicely my iron burn is healing (ick, sorry)

Then I stacked them up in this order:
-napkin (right-side up)
-trim (right-side up with the un-pressed edge lined up with short side of napkin)
-trim (wrong-side up and with the un-pressed edge at top also)
-napkin (wrong-side up)

I folded each over a little to give a sort of cut-away view:

Sew around the perimeter with a 1/4 inch seam allowance. At the corners, leave the needle in the down position and pivot the fabric to make sharp corners. Leave yourself a 3 inch hole to turn. Clip the excess fabric at corners, turn right-side out and use some sort of poker-thingy to gently push the corners out. If you lined all the pieces up right it should look like this when turned and pressed:


Topstitch around very close to the edge. Remember that pressed edge? Topstitch along the pressed edge of the trim also making sure to catch the pressed edge on the other side:


Here is my finished set. One for each adult plus a miniature for Buggy so she feels special too:
All that cutting of strips left my tablecloth a little too short (oops) so I cut some strips of dark brown fabric for a border. It ended up giving it a nicer finished edge. Yay for happy accidents. And here is the squash I was thinking of using for a centerpiece:

Hmm, you're probably right. It would be hard to have a conversation around that thing. But what, I ask you, should I do with a 50 pound squash? This is actually what I was thinking of using:


Happy Thanksgiving from our family to yours.

Saturday, October 10, 2009

Girl's Dress Refashion

I found a dress in the $1 bin at my favorite consignment shop and liked it except for the fact that it was a back-less halter style. I like to dress my little girls like, well... little girls. So it came home with us but found new life as a skirt. I took pictures as I went so I could share; I was thinking this would work equally well to salvage a favorite dress that has a stain on the top.

Here is the original:


1. I cut the bodice off and measured my little victim daughter to find the length of the skirt that looked best when sitting at her natural waist. It was a bit long so I cut a couple inches off following the curve of the original waistline (the full skirt is folded in half in the pic). Here we see the dissected dress nicely laid out:


No? How 'bout this:


2. Cut a piece of coordinating fabric for the waistband. Go ahead, interrupt whatever your daughter is doing to measure her waist; she won't mind at all. Buggy's waist is about 19 inches, I needed 2 in. for ease so it can be pulled over her tushie and an inch for seam allowance. So I cut a 22 x 4(width) in. strip of white material. Sew the short sides together, right-sides facing, with 1/2 in. seam allowance to form a ring; press seam open (oops, didn't get a photo of this).

3. Sew, using a long stitch, 1/4 in. from the top of the skirt, leaving the threads long. Pull on one thread to gather the fullness of the skirt to the size of the waistband. Evenly distribute the gathering and pin, right-sides together, to the waistband:


4. Sew, with 3/8 in. seam allowance, so this stitching is just on the outside of the thread used to gather. Press the seam so the allowance is toward the waistband. Also, fold over the other long edge of the waistband 1/4 in. as shown in the photo and press:


5. Fold waistband in half, lengthwise, with wrong sides together so that the pressed edge slightly (1/8 in.) overlaps the stitching of the seam you just finished. Pin in place, but place your pins so they can be easily removed from the right-side of the material (you'll be sewing "blind"!). Like so:


6. Sew veeery carefully just along the right-side edge of the waistband so that the stitching catches the pressed edge in the back. Stop short of sewing all the way around, leaving a 3 in. opening to insert the elastic. See how the raw edges are enclosed in the waist now? Very nice:


7. Cut a piece of elastic that is equal to the waist measurement minus about 2 in. (17 in. for this example). Thread elastic thru the opening. You can just overlap the ends of the elastic and securely stitch them together to form a ring or try this method: Cut a small scrap of material the width of the elastic and sew the ends of the elastic to it. This way it lays flat and eliminates the uncomfy bump in the waist. First side:

2nd side:


8. Tuck elastic ends into the waistband and do a little test run to make sure it slips on and off easily. If all is well, finish stitching along the waistband.

Ta-dah:


I had originally planned to use the dress top to make sort of a sash/cummerbund but couldn't get it to look right. So I unpicked the little flowers on it and attached them to the waist of our skirt with some pink ribbon from the stash. With a flower left over to sew onto a hair elastic:

Monday, October 5, 2009

Birthday Fun

Our sweet little niece turned 4 this weekend so we've been busy making her gifts. Buggy was in charge of the customized wrapping paper. I cut a section off of our roll of blank newsprint, opened a new box of crayons and set her to work. I didn't take a picture because... well, lets just say she doesn't have a future in the wrapping paper industry. She kept getting side-tracked by absolutely everything except her project.


My contribution was a new outfit, and since the birthday girl likes dresses and ballet it was a tutu-ish skirt with this matching top (seen here modeled by the lovely Buggy):


It was pretty simple so I thought I'd share how I made this little embellishment:


1. I cut out a paper heart the size I liked and pinned it onto the wrong-side of the shirt using a four-year-old body as a placement guide. I also added a layer of light sew-in interfacing, I'm not sure that this step is necessary but I used it since this was my first time sewing on a tee (I did all this on the wrong-side so I could keep track of my interfacing, which wouldn't be necessary if you skipped it). Then I carefully stitched around the pattern with pink thread:


It occurs to me that this would be a great embellishment on its own, assuming your bobbin does not implode three times while trying to sew a tidy heart. This is how mine looks on the right-side after this step:


(My crummy sewing skills are only surpassed by my even crummier photo editing skills. Ah well, you get the idea)

2. I cut some 1-inch strips of tulle and stitched down the middle with a long stitch. Pull on one thread to ruffle it up so it matches the perimeter of the heart and pin it down using the stitching as a guide:


3. Then just carefully top-stitch along the heart. I left the ruffle thread in because I thought it added to the look nicely (and because separating it from the tulle is a pain in the kazoo). Here we see my model workin' the entire outfit:


The skirt was inspired by this tutorial on Pink Picket Fence. I made a basic three tiered-skirt and sewed on a couple rows of ruffled tulle per tier. I could do a little how-to for the skirt too if anyone is interested.