Saturday, February 20, 2010

Thrifting Finds

I saw a post on another blog with some really great vintage fabric and it reminded me that I haven't been telling you about my thrifted goodies. I don't know why, I mean, I like thrifting vicariously through other people and I've found some great things lately (giant picnic basket where my yarn now resides). I need to quit trying to figure out what other people like and remember that this is a blog of things that I like. And I like cheap stuff:


Speaking of cheap, those apple were free. Thank you neighbor man.

Check out that bowl, its all one piece of wood! Do you know what I mean? Its not a bunch of blocks of wood glued together and then carved into a bowl. Its one big ol' chunk. They don't make stuff like that anymore. Well, not for $1.99 anyway. Mr. SimpleHeart offered to refinish the bowl for me, but I like the rustic-y look.

And I'd just like to say that there are enormous benefits to frequenting the same shop and being familiar to the folks there (or maybe its because the shop is run entirely by dudes). Either way, my buddy at the register rang those sheets up at 50% off (even though they weren't part of that sale). Thank you thrift store man.

Wednesday, February 17, 2010

Knitting Knews

I told you about the fuzzy yarn I bought and my plans to make a scarf. And I believe I mentioned that knitting does not come easily for me; this time is no exception. I found this free pattern on the Berroco site and gave it an honest try.

berroco-piece

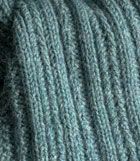
See the pretty ribbing? I so wanted to make this.

berroco-piececlose

But I lost count of all the times I had to rip the whole thing out. I don't know how to fix mistakes, you see. I can only go forward, so when I drop a stitch or make a mistake I just sit there dumbfounded. Trying to go backward and unknit stitches makes me want to stab myself in the eye with the needle and forget about taking the needle out and ripping stitches with the intention of putting the needle back in. So when the first few yards of the beautiful (and expensive) yarn started to show wear from my fumbling, I realized I needed a Plan B.
If I wanted to wear the thing anytime before August, something different had to happen. I told myself that knitting any kind of pattern would just have to wait until the girls are a little older. I have enough trouble without somebody asking me for a cup of juice in the middle of a 'knit back and front of stitch'.
So, I did all three skeins in basic knit stitch and came up short. When I went back to the yarn shop for another skein and forked over another $8, I started having second thoughts. If I was going to pay that much for yarn I should use it to make what I really want, not what is good enough. Right?
Right. So I tried anew with the fresh skein of yarn (much to the confusion of Mr. SimpleHeart). And lemme tell you, its not going any better.
Then I read this post on Posie Gets Cozy and it really resonated. But just keep knitting knowing full well that you've made a mistake and being OK with that? Not likely to happen here, that's a sure way to bring the eye twitch back.

So now what? When I was looking around on the Berroco site for the scarf picture, I found this:

berroco-star

Oooo, purty. Never mind that its rated Intermediate, I shouldn't let that discourage me.
Right?
Right.

Monday, February 8, 2010

Its Too Quiet

That makes me nervous. What do you suppose they are doing?
Oh, there they are.

What's so interesting? What could have possibly held their attention for so long they forgot to argue about who is getting the sippy cup?
*gasp*
A little deer is tearing up my carefully manicured lawn!
Ooo, the landscaper is going to be livid!
I'll zoom in so you can have a closer look. He looks pretty rough. We have a parasite in this area that makes the deer shed their hair in weird clumps and patches. Poor little guy.


Wait! Don't feel too bad for Scruffy. See that iris behind him that is just beginning to come up? Yep, gone.

Thursday, February 4, 2010

And the winner is...

Me!
This has been a week of disappointments, both blogity and otherwise, so at first I was feeling down because my giveaway was a dismal failure.

But then I thought about the people who did comment. First, Erin, whom I emailed out of the blue regarding including her blog in my Why Cast Iron? series. She has been friendly and supportive of my little endeavors from the start. I'd be disappointed if she didn't win.

Then, last night, I let out a whoop that made Mr. SimpleHeart jump and say "Whaa?". I squealed, "A celebrity commented on my giveaway". His eyebrows shot up so I had to clarify what celebrity means to me. She's not in movies or a famous band; Rachel (of One Pretty Thing) is a craft blog rock star! I just visit her site every day to see what goodies she has rounded up from all the talented craft bloggers out there, no need to spend all day online. If I want to make something and I'm wondering if a tutorial is available, I don't Google it, I use the search feature on her website. She has single-handedly saved my children from eating canned soup for dinner every night. I'd be disappointed if she didn't win.

So, random number generator, I say phoey on you. I'll give skillet mitts to whomever I dang well please. I'll be contacting both "winners" to see what size mitts they prefer.

Monday, February 1, 2010

Diaper Wallet Tutorial

They grow so fast, don't they? My little baby is spending the Sunday School hour in the nursery now instead of nestled in my lap. So its time to pare down what I carry, we really just need the necessities now in case of ... well, you know. I looked around for a diaper wallet tutorial but wasn't thrilled with the pouch style that I found. I thought I'd prefer the folding type I've seen so I had to wing it. But you don't, here is my spanking new tutorial for a folding-style diaper wallet:

1. Cut your main fabric pieces:

2 - 11x12 in. pieces for the inner pockets

2 - 11x14 in. pieces for the outer shell. It would be fun to have different colors for the inner and outer sides of the shell too.


Also, think about what kind of closure you would like to have (or if you want one at all). I made a tab with a button on the outside, but a magnetic snap or velcro would work equally as well. If you opt for a snap it should be inserted in step 2 (follow instructions on snap packaging) before the pockets are sewn to the shell.


2. Fold both pocket pieces in half lengthwise with wrong sides together; and press. Align the long raw edge (arrow points to this edge in the photo below) with the short side of one of the shell pieces; right sides facing. Sew around just the 3 sides that have raw edges with a 1/4 in. seam allowance. At the corners, leave the needle in the down position and pivot the fabric to make sharp corners. Leave the folded edge open as in the photo. Repeat for other pocket. It will look like this:

3. I decided on a rounded tab and button closure so I used this specialized tool for making the rounded edge. Actually, this is a gasket thingy from a sippy cup, but any round-ish object you find around your house would work too. Or you could make it square. Just trace around your special tool:


4. Extend the curved edge with a ruler so that it measures about 3 1/2 in. in length. Cut 1/4 in. from the line for a seam allowance:


5. Place the pieces right sides together and sew around 1/4 in. from the edge. Clip the seam allowance around the curve:


6. Turn the tab right side out and press. Pin to the pocket with the raw edges aligned. Place the other piece of shell fabric on top with the right sides facing. Like so:


Here it is with the top piece of fabric folded back a little to give you a better idea of what your fabric sandwich should look like at this point:


7. Pin all the layers together. As a reminder to myself not to sew all the way around I like to leave doubled pins where I should stop:


8. Now sew around the edge with a 1/2 in. seam allowance, stopping where the double pins are to leave a space for turning the fabric right side out. Clip the excess fabric at the corners and turn right side out. Gently poke the fabric at the corners so you have a nice rectangular shape and press. Topstitch around very close to the edge and your wallet will look like this:

9. Now just finish up with a button hole in the tab and sew a button to the opposite side (or use velcro)
See? Super easy. I think this would be a great beginner project. Let me know if you make one, I'd like to see.

Skillet Mitt Giveaway

This giveaway is now closed. Thank you to all the participants...both of you.

The number of visitors to my little blog has been up this last week so, as promised, we're having a giveaway.

This giveaway is for a set of two cast iron skillet mitts. I made a shorter size last week and added it to the shop, so the winner can pick the sizes they prefer. Two standard size, two stubbys or go crazy and get one of each.


I love these little mitts and use mine everyday. I keep them on the skillet handle through cooking, cleaning and storage until they look so gross I'd be embarrassed for guests to see them. Then I just pop them off and throw them in the wash with the kitchen towels. Super simple to care for and no burnt fingers.

I've been waffling about how to hand out the chances to win. It doesn't seem right to offer you an extra chance to win if you tweet the giveaway. For one, I have no idea what that means really since I've never tweeted anything in my life. Nor do I have a Facebook page or any plans to do either of those things in the near future. So here is what I've decided:

1. a simple comment will get you one entry.

2. if you subscribe to this blog with a Reader or via e-mail, leave a separate comment letting me know and that will double your chances to win.

3. if you have a blog and post about this giveaway, leave another comment (with a link so the rest of us can visit you), and you'll be entered again.

This giveaway is open to everybody, including folks in other countries. It is open until midnight PST on Wednesday (2/3/10). Winner will be choosen with a random number service and announced on Thursday (2/4/10) morning.

Eeek, I'm so excited.

Ready, Set, Go!